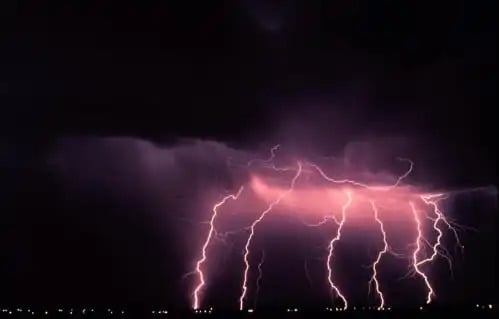
Capturing lighting in a photograph is one of the most difficult, yet rewarding things a photographer can do. You don’t get second chances as you do with a model or even a normal landscape. Its brightness, location, and intensity are different every time. It would seem setting the camera requires a lot of experience, and why not admit, a certain dose of luck.
It is important to note, that before you go out shooting the next thunderstorm, you must be aware of the fact that you are, to a certain degree, in constant danger.
Tools
First of all, make sure your camera has a B shutter mode. Automatic compacts are not recommended this time. You will also need a tripod. In terms of safety, I would say there isn’t that big of a difference between a metal and a plastic tripod. You are taking a chance anyway. I would definitely not go for a carbon frame though. I don’t know if it makes any scientific sense, but there’s just something about carbon’s outstanding ability to conduct electricity that makes me take it off the list.
Lightning tends to be unforgiving with lenses. It’s known to bring out optical flaws like excess coma effect at low apertures, scratches, fingerprints, etc. Make sure you take a decent, clean lens with you.
Nikon D600 | Nikon D7100 | Nikon D800 | Canon 5D Mark III | Nikon D5200 | Canon 1D X
Location
The good news is that you can shoot anywhere. You can capture fantastic lightning photos from your balcony, provided it’s not that bad a view. If you want to get serious, find a good location and make a note of it for the future storm.
Whatever the location, I strongly advise photographing from a dry, indoor spot. If this is not possible, please take the following precautions:
-Do not use a cell phone. Turn it off. Period.
-Do not go shooting into an open field during a storm. No lighting photo is worth that much risk. If you have a different opinion on this, I can’t help you.
-Do not get too close to trees.
-Stay out of water. You might as well pray for it to happen.
-Do not wear jewelry. Highly conductive.
Photo: NASA
The Technique
There is no rule ( think sunny f16) for photographing lightning. But in theory, it’s pretty simple. Many new photogs try to be as quick as the beam, which they will obviously never succeed and press the shutter release as soon as they see the flash. They end up with dark photos of nothing. Switch the camera to B shutter mode and arm yourself with a remote or wireless trigger. The B mode allows the shutter curtain to remain open for as long as you hold the release button. As soon as you let go, the curtain drops. Open the shutter, wait for lighting to strike in your frame, close the shutter. That’s it. The actual time of exposure can only be determined in each specific location, but you get the point. Complications, however, may occur from street lighting, pollution and cloud movements.
Depending on the distance between you and where it strikes, the shorter the distance, the lower the ISO and the smaller the aperture. If it’s less than a mile, use ISO 100 and f11-16. Between 1-5 miles, go for f8-11. For anything further than five miles, boos the ISO to 320-400 and use a larger aperture.
While it may not be the safest way of getting a good photo, it certainly is rewarding. Be safe and have fun!


